Downloading ExcelPipe...
Finish setup in 1 click - Get 10% off
Once the download completes, double-click in your browser download bar to start installation.
Digitally signed by DataMystic. Works on Windows 10/11 and earlier
As used by thousands of data professionals worldwide, ExcelPipe is the trusted choice for data manipulation and automation. With a 4.8/5 rating from over 500 reviews, it's the go-to tool for anyone serious about working with data.
Trouble installing? See these options:
- Download ExcelPipe - In a corporate environment, you may need to take additional steps to install it, see below
- Download ExcelPipe ZIP file - works around corporate download restrictions
- Open in Microsoft Store Minimal installer, no admin rights needed. Misses a lot of useful samples, shell extensions etc
- Check the download help.
ExcelPipe installation troubleshooting tips
1: The app you're trying to install isn't a "Microsoft-verified app"
Windows may show this warning because ExcelPipe is downloaded from our website rather than the Microsoft Store. This is normal for most desktop software, despite it being digitally signed etc. It is basically Microsoft trying to strangle the software market and force all installs via the Microsoft Store.
To install:
- Click Install anyway in the dialog, or
- Click Change app recommendation settings
If the "Install anyway" option is not shown, you need to change your Windows settings:
- Open Settings > Apps > Advanced app settings
- Under Choose where to get apps, select Anywhere
- Run the installer again
On older Windows 10 versions: Settings > Apps > Apps & features, then change the dropdown at the top.
Alternatively, install the Microsoft Store version which does not require this setting, but also excludes all the things you expect from desktop software like context menus in Windows explorer etc
2: Windows SmartScreen Warning
You may see "Windows protected your PC":
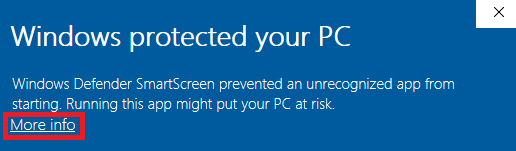
If this appears:
- Click More info
- Click Run anyway
3: Antivirus False Positive
ExcelPipe is digitally signed by DataMystic. If your antivirus warns about the file, it may be a false positive on new releases. You can safely allow or allow-list the installer.
4: Corporate IT Restrictions
If your organisation blocks installations, use the Microsoft Store version instead (no admin rights needed):
Getting Started
After installing (see the guide), you'll want to get stuck into ExcelPipe.
- On the Actions tab, add a row for each pair of Find What/Replace With values
- For each row, check the Search Location where you expect the text to be found. Remember to check Inside Hyperlink Addresses if you are changing hyperlinks
- On the Files to Process tab, set the Start Folder to the location of your documents. If you are using Excel 2007, set the File Type to *.xls*. Remember to check Include Subfolders if you want subfolders searched as well. You can also drag and drop your files from Windows Explorer into ExcelPipe
- On the Options tab, check the Backup Mode option, and any other options you need.
- Click [Start Replacing] or [Search Only] depending on whether you want to Replace or just Find the text.
![]()
ExcelPipe is our multiple search and replace solution for Microsoft Excel spreadsheets (*.xls).
- for Microsoft Word (*.doc) - download WordPipe, or click here for more info
- for Microsoft PowerPoint (*.ppt) - download PowerPointPipe, or click here for more info
- for text files (*.txt, *.htm, *.xml, *.csv, *.tab, *.prn etc) - download TextPipe Pro, or click here for more info
Release Notes
Note: Will not work with Excel Starter Edition (this is a cut-down version with zero integration capability)Read Release Notes
Feature Comparison: Trial vs. Paid
| Feature | Trial | Paid |
|---|---|---|
| Usage Period | 30-day evaluation | Unlimited usage |
| Startup Experience | Nag screen on startup | No nag screen |
| Support | No priority support | Priority email support |
| Updates | Trial version only | Free minor upgrades |
Instant delivery · Secure payment · 30-day money-back guarantee